My first Alpha is live! I am having a contest too!

Good day everyone!

I am having a contest! Details below!

I have finally gotten my game into a state where I consider it “early alpha”. The core of the game is mostly completed, with a few missing features and missing levels. Currently I have completed three levels. At this point in time, before I dive into creating more levels, abilities and start expanding this project out, i’d like some feedback. FROM YOU!

The best kind of feedback you can get (or so I read) is watching someone play your game! I would LOVE it if you could take video/create gif’s of you playing my alpha! I’d really love to see how you play my game! Even if you can’t do this, I would love to hear from you on my twitter @jayohhgames or my wordpress, or Hotmail or itch page!

//itch.io/embed/34215

Please remember this is an Alpha, game is subject to change and there may be a few bugs. I few of the UI features are missing such as coin display. I am releasing this mainly for feedback on the gameplay, but any bug reports are more than welcomed!


Welcome to the public alpha!


— Current Version: Alhpa V0.1

— Developer: JayOhh Games

— Contact: jayohhgames@hotmail.com @jayohhgames

This game should be able to run stand alone. Please download both files, the .rar and the .exe.

Extract the .rar files into the same location the .exe is located as. Double click the game and enjoy! Please leave me feedback on either my twitter, on here or in my email address!

Please remember this is an Alpha! Few features are missing and you may encounter a few bugs. The goal of this alpha is mainly for gameplay feedback, but bug reports are always appreciated.


Contest: This alpha contains 3 levels. I will give away one copy of my game (once completed) Β to the top fastest time in each of the three levels! Please submit a video or gif of your best time run from start to finish if possible! This contest will be open for two weeks, once the contest is over, the alpha will be over as well.


Fun with learning level systems!

Hello!

I’m back with a bit of my noobish approach to a level system! I have successfully implemented something that is working at least hah πŸ™‚

Currently what I have implemented is:

Start of level canvas // end of level canvas

This is just a sprite that is spread across the screen. This is a canvas object that is configured like this in the inspector and this in the heiarchy(Don’t mind me, I havne’t named everything ;)), and like this in the inspector .

This setup above is placed in each level. This is manually configured in terms of the text that shows for the level name. The rest is determined on load programatically. This canvas is enabled on start, and the script I have attached slowly fades out the canvas and eventually diables it. This start canvas also freezes time, and enables the “Ready, Set, Go” countdown. This also starts the timer for each level!

Dynamic text on each start/end screen (as well as overworld sign)

I display the best time, and if you earned the bonus on the sign infront of each level.

This information is the same that is displayed on the start and end screens. It is all loaded programatically through the level system I implemented. Basically how it works is I have a Level Manager, that contains multiple Level classes. Each Level class contains the level specific information like best time, par time ect.

[System.Serializable]
public static class LevelDataManager {

   public static level level1 = new level("ForestLevel1", 1, 45.00, 0.00, 50, false, false, false);
   public static level level2 = new level("ForestLevel2", 2, 125.00, 0.00, 100, false, false, false);
   public static level level3 = new level("ForestLevel3", 3, 150.00, 0.00, 100, false, false, false);


    [System.Serializable]
    public class level
    {
        public string levelName;
        public int levelNumber;
        public double parTime;
        public double bestTime;
        public int experienceWorth;
        public bool bonusGranted;
        public bool lpBonusCollected;
        public bool levelCompleted;

        public level(string in_levelName, int in_levelNumber, double in_parTime, double in_bestTime, int in_experienceWorth, bool in_bonusGranted, bool in_lpBonusCollected, bool in_levelCompleted)
        {
            this.levelName = in_levelName;
            this.levelNumber = in_levelNumber;
            this.parTime = in_parTime;
            this.bestTime = in_bestTime;
            this.experienceWorth = in_experienceWorth;
            this.bonusGranted = in_bonusGranted;
            this.lpBonusCollected = in_lpBonusCollected;
            this.levelCompleted = in_levelCompleted;
        }

 }

So above I just pre-create each level. This is created everytime the game loads up, and is also replaced if the player Continues their game.

The saving and loading I will handle in a later post. But basically how it works is I store a list of all the games levels in my “DataManager” class. And this list gets saved, and loaded accordingly. This keeps the values of your best time as well, so it persists between play sessions.

Some fun expanding my knowledge of UI!

First off…Unity’s Animator works with UI components….MIND BLOWN.

This was pretty fun to play around with. Now I need to go back to my original UI design and change a few things! Adding that little animation makes it look so much more alive I think. It’s as basic as just selecing the object with your worldspace canvas, and creating an animation. Move the canvas only, and create your animation! Through script you can control it like any other animation:

 void OnTriggerEnter(Collider collider)
    {

        if (collider.gameObject.tag == "player")
        {
            Debug.Log("Play DoorPost Enable Animation");
            gameObject.GetComponent<Animator>().SetBool("openInfo", true); 
            //gameObject.GetComponent<Animator>().Play("PostInfoEnable");

        }

    }

Spawning/Despawing collectables

So handling the spawning and de-spawning of one time only collectables has been pretty easy. Basically I have a variable in my level class that determines the first type of collectable, the LP bonus. This is saved and checked on load/collect. If the player has collected it, it is destroyed on load.

    levelToUse = DataManager.levelList[levelNumber];
    if (levelToUse.lpBonusCollected)
    {
        Destroy(gameObject);
    }

If needed I can simply add more variables to my level class as my game expands. I can even nest a list for all of the coins in each level if I want to go that far!

Title Screen

Image

Adding this in actually required me to overhaul a good chunk of my code. I’m glad I decided to start working towards a three level early alpha release. I decided to make the title screen and its a good thing. It changed the way that I handle the saving and loading my game, as well as moving all of my “Dont destroy on load” objects from the old tutorial scene to the new title scene.

This made me have to re-write a few references in my successive screen to objcets that I had to move. It caused me to have to re-visit a bit of my level loading code to ensure things were saving/loading correctly.

I made this with existing assets from my game. If you watched the video, it is actually animated so it looks a bit better than just a picture :). This was another stab at doing some UI work. Currently this is just a basic canvas that has three buttons. Options is not configured yet, as looking into adjusting resolution/controls/sound and all that stuff is something I have NO idea how to do! The text is actually created using Inkscape and ported into Unity as sprites! Found it actually worked really well πŸ™‚

Start New simply just loads the next level of the game fresh start. Pretty basic here, not a whole lot to explain.

Continue, this checks the unity local persistance directory for a file, if found it loads the game accordingly.

Questions, comments, feedback anything is cool πŸ™‚

Does anyone else keep an end of the day dairy?

I keep what I like to call a “developers diary” on my desktop. This file is just basically something I keep for myself, to read the next time I sit down to work on my project. In this diary I write my current thoughts and progress for the day. While it is fresh in my mind I write down any bugs I may need to fix or anything outstanding that needs to be done.

Inside I tend to list a little TODO of things that I can be doing. This way when I sit down I know where I last left off, no matter how long it was. I always have something to work on, and I tend to give myself a nice range so I don’t get too tired of things.

This is mine for the night πŸ™‚ I keep it in a notepad doc on my desktop.


2015-08-08 — End of night

– The acorn particle systems still don’t appear to be working correctly.
– The attack ability allows mouse click too many times! Should only allow once.
– Save in build seemed to not work as expected. Loaded the wrong level!
– When level is loaded and has already been beat, ensure finishline is spawned.
Overall good day, got a lot done. Created the level system, including a basic particle system for the level up. Added in a stats system, fully saveable. This system is
integrated with the player controls. So the players max health ect. Right now I give the player 3 points to spend per level up. EXP per leve is incremented by x2, and starts
at 50. Each ability level up is just a static amount. For example adding a skill into jump height gives you a flat 20 jh. This does effect the players jump height!
UI was pretty damn easy to setup. Added the images for my buttons, added the text for each ability I needed to level. Added text for pressing the button to say the player
wants to add X amount of X ability. I made sure that the players current spendable level points can’t be exceeded, and they are updated once points are spent.
TODO:
– Add in a visual representation for EXP.
– Add in left panel UI ties for forest collection.
– Fix initial bullet points.
– Create model for door level number.
– Create world space UI for level door.

Here is some bonus media showing my progress, check it out!
Full playthrough:
Level system:
Thanks for reading! Like comment or hit me up on my twitter @jayohhgames for regular updates πŸ™‚ ❀

Lots of progress this last week! Saving, loading, attack, damage, level load and a few more!

Holy crap I got a lot of features done this last week haha I was busy! I’m having a blast learning Unity and Blender at the same time and have been sowly getting faster at my workflow. I’m going to go over everything that I have done so far!

Saving Sysytem

This was super fun to learn. I did a bit of reading around the webs, and ended up settling on Unity’s live training tutorial on data persistence. It was a pretty solid basic introduction to Binary Serialization, and how to save data in your game. I went with a very similar setup!

I have an empty game object with my SAVE script attached to it. This script contains the methods for saving and loading. This game object is then placed under the UI Button as a reference. This allows the UI button to call functions within SAVE. This is how I am calling the two methods I wrote in my SAVE script.

Two methods were needed for my basic saving. One for save one for load. The save is currently saving all important data that is needed to build my game. It is writing to the local unity persistence directory as a .dat file. Right now I only have it configured so you can have one save at a time, and I haven’t created the UI to handle picking saves to load.

Here is a GIF of it in action:

https://gfycat.com/CleverFearlessAlligator

Here I went through first and did a run up to where I am loading to. I saved there and killed the unity player. I loaded it up and started recording ,the load takes me to where I pressed save! It works really goodΒ  and I am happy with it!

Attack System

So the attack system is pretty basic. I added an additional child gameobject to my player. This child contains a sphere collider and a short script. Script contants the logic for how much damage to apply. I then created a tag “canTakeDamage” for any game object that the player can attack. These objects have a script that has the methods for taking damage, as well as giving damage.

Having it setup this way is pretty easy for me to use repeatedly. All I need to do is set a few variables in the inspector for how much health/damage ect and its easy as pie. I can easily tweak and edit balance on the go this way. Give an enemy 5 HP, if that is too much I can just tone it down without writing code. The only downfall to this method is that anything I want to take damage, must have the “canTakeDamage” tag, and as far as I know you aren’t able to add multiple tags.

Here is a GIFof the attack system in action:

http://gfycat.com/LegitimateGrizzledGallowaycow

Damage System

http://gfycat.com/AccurateUnsungGiantschnauzer

Damage system was a fun one to write. If you looked at the images above you see that I have a mesh swapping system in place. I was trying to come up with a good health bar system. Couldn’t come up with anything solid so I decided to make a visual mesh swapping system for health representation. This removes a bit of UI clutter and I’m really happy with how it turned out!

To implement it, is quite easy. I created a sphere model in blender, named it “full health”. In that same blender file, I pushed in some of the vertices to make it look beat up.Β  Once happy I hit “save AS” and did “player damage 1”. I repeated this process 4 times so that I had 5 states. Full health, damage1, damage2, damage3, damage4 (this is death). Damage 4 was made into two separate mesh’s so that I could apply rigid bodies and use them as a death animation. As seen in the video above, My death animation is actually me just instantiating the object on death at the players positon, and turning off the player!

I am also keeping track of health and damage taken/given so that they can be saved.

Level Loading

Not much special to talk about here. I have my scenes setup with names, and each door I have placed in my scene has a name that cooresponds to a scene. When the player enters the loading zone, I am loading the level that is given in the door. When a level is loaded I am saving that variable in the DataManager static class. This is so I can keep track of what level the player is on currently. At the end of the level I am sending the player back to the overworld spawn point, so that portion is straight forward.

One tricky thing I had to do was with ensuring my shards aren’t re-loaded when the level is loaded and the shard has already been created. This was a bit more tricky. I created a class called Shard. This class holds the shardNumber and bool for “collected”. In my datamanager class on game load I create a generic list full of shards class. Each level is defaulted to collected no. The shard script is added onto each shard placed on my scene. When the object loads, it checks if it has been collected already and acts according! Simple simple!

UI First Experiences

Well my UI turned out alright…definitely not going to make it into the final build, but good enough for me to use and code with for now! I am terrible with these kind of graphics so it was an interesting process. All my UI art was created in GIMP. I laid it out with basic shapes and then just went from there!

Learning the UI for unity has been really easy. Create a canvas, set your anchors and add your objects and boom done! Not sure if you noticed, but I have it so that the “inventory” windows pop up on tab press. That was a simple check in my player controller script for the tab key. If pressed I am enabling both tabs. It was a really easy solution, and doesn’t look all that bad.

Working on level 2

Level 1 is almost completed! I’ve got a start and an end, just need to spend some time jazzing it up and adding in some secrets πŸ˜‰ I’ve got the models for level 2 all created and imported into Unity as of tonight. I was starting to lay everything out, then had to call it a day.Β I’ll be posting more when I start working on making level 2 awesome!

Some more bonus content:

Timelapse of creating a switch:

Thanks for reading and thanks for supporting! I’ve had so many views on my youtube and lots of love on my twitter. thank you!

Coin collection! Particle Systems and rotation/collection scripts!

So I spent some time today trying to make something look pretty! I realize at this point its a bit wasted effort, but I had a blast. I was able to make a somewhat satisfying coin collection animation using unity’s animator, as well as simply adding a basic counter to the UI canvas.

EDIT: https://www.youtube.com/watch?v=Geb-HwBExdQ

Particle Systemsssss

So I am slowly starting to understand how particle systems work finally! I was able to create the star animation quite easily! This is what it looks like up close.

Gif of particle animation!.

So basically all I had to do to create this was a few settings in the particle system of unity.

Particle Emitter settings.

Particle Emitter settings.

The biggest thing was just setting the renderer to the mesh that I made in blender! Once you do that, the particles take on the shape of the renderer, and it’s easy to play with the settings from there. Sadly, this took me quite awhile to realize so I was pretty happy I figured that out today.

Also, I’m not controlling the particle system at all in terms of the code! It just plays on loop until the disabling of the game object.

Rotation and Collection!

So the rotation was quite simple. Just one line of code.

Stream Image 2

Basically all this is doing is rotation around itself, on the y axis (vector3.up) by 1 degree. This fires in update so you can adjust that value, I found leaving it at 1.0f was a nice rotation. Next thing I plan to do is find a random number at a suitable speed range and use that so they don’t all rotate at the same pace.

Collection Script

This was pretty standard straight forward. I haven’t written my object pooling system yet, so this is just using destroy, but I am aware of this being bad practice! All I’m doing for collection is quite simple:

Stream Image 3

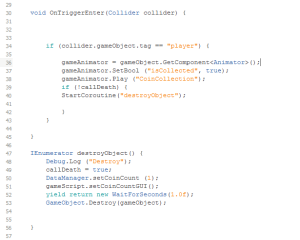
So what I’m doing here is just getting the animator component. I’m using it to then call the animation I want. And after that is kicked off I’m starting a co-routine. I changed it to this method as it makes it so the animation plays out nicely before the game object disappears. I had it inside the same method before, and the animation wasn’t even playing.

In the co-routine I’m just:

  1. Setting a bool to ensure I only ever call the coroutine once.
  2. Setting the coin count in my data manager class.
  3. Setting the GUI update for coin collection
  4. Destroying the object.

And for #4, that will be replaced with my object pooling functionality.

Animation

Still trying to get a hang of this animator. What I ended up having to do for this animation was create an empty game object, and make it the parent of the coin mesh itself. I applied all the animations to that core game object, moving the coin and recording the parent’s transform. This allows the animation to remain the same no matter where you put the object (Just ensure you are using root motion!).

Some good model progress today!

Well it was a long night modelling! But I finally came up with a sweet first landing spot after my tutorial level! This will be the beginning platform for the “overworld” type areas; for the forest area anyways. I think I kinda messed up on the lighting though haha πŸ™‚

Gif of my asset in funky light!

So I modeled the ruin looking things, the platform, the sign, and the island and water. Not the fastest at blender but starting to come along nicely. This is what it looks like with normal lighting.

Gif of my asset in normal light!

Still need to adjust the lighting and a few things in the game to make my assets shine! They are looking pretty good for what i’m after, so overall i’m happy.

hohooo! It has been a long time! New game progress!

Harrrr, been away with my head tucked into blender and art programs and learnninnnngs! Working on a new simple project trying to learn unity πŸ™‚ It might just turn into a game if I like it enough. So far working away, I made a little progress video of what he tutorial level is going to look like. Still missing quite a bit but slowly implementing features as I go.

Features Complete:

  • Β Respawn System
  • Camera Orbit
  • Relative to Camera Movement
  • Shard collection & GUI display
  • Door Logic — Need enough shards to pass, just need graphic to display amount required.
  • Level Loading

So many things to do and so many models to make! I’m slowly piecing together the set of tiles I’ll need for my next level. It will be the hub world! Excited to start piecing my idea together πŸ™‚

If you have any questions just give me a shout on my twitter @jayohhgames. I check that pretty often! I’ll be keeping up with regular posts now I swear!!

New character concept

Ahoy everyone!

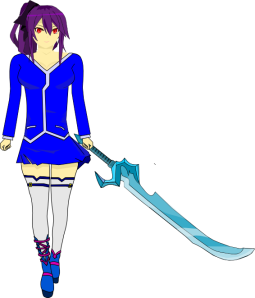
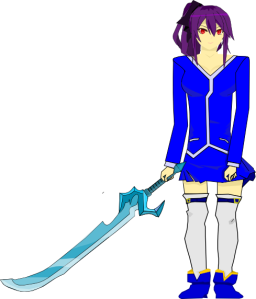
I’ve been hard at work learning how to art. I’m not a great artist, but I think through some practice I might just be able to get decent. Recently discovered inkscape and I must say it is an amazing program! So far I have had much better success creating art for it than with Illustrator. Here is the image for my new character. I’m pretty happy with how it turned out, it may still need some tuning, as I need to make sure animations will work.

I will be using Spriter and Spiter2Unity program/plugin to port it into Unity for the animations. But before I go down that road, I will be working on the game art for my procedural dungeon generation. I’ve been reading and reasearching on some techniques to handle procedural generation. I’ll be the first to admit it might be a bit over my head, but I should be able to figure it out I hope. My goal is to have some basic art elements completed, so I can focus on generating the core gameplay of my new game. The main hurdle I am facing right now is getting the dungeon generation up and running. Nice thing about procedural, is once I get that working flawlessly, that makes up a LARGE portion of my game! I’ll just need to make different art for each level, sub it in and whaaaamy, 70% of my game completed.

Without further adue, here is my main character!

Character

Bouncy on hold, new project begins..

So after getting some of the core game play working and a few bosses created, I’ve made a decision to put this project on hold. I find that this game just isn’t that fun to play! It isn’t quite challenging enough, and I find that I am very limited by developing for a mobile platform. I have so many ideas that I’d like to implement but there just isn’t enough space on a mobile device!

So, I’ve made the official decision to start into the world of PC game development. I will take everything that I learned from developing Bouncy and use it to make this game amazing. I’m quite excited by the lack of limitations with PC development. Who knows, once I get a prototype working that is engaging, challenging, innovative and fun maybe I’ll toss it up for greenlight?

I’ve also picked up Inkscape, I’ve been struggling to create nice looking graphics using Illustrator. So far, after 3 hours of working with Inkscape I must say it suits my brain better. Less struggling with trying to get my ideas down in design will be a huge benefit. I’m working on my main character design at the moment, I’ll post a few screen shots when the progress is more presentable! So far she is looking good πŸ™‚

The new game will be a rouge-like, top-down, action/adventure game with a mix of procedural content generation and static content. It’s a bit of a mouth full to list off the mixture of genres that I’m planning! Think Street Fighter meets Legend of Zelda meets Binding of Issac meets Secret of Mana. I’m a big fan of perma-death so that will play a big part in my game design. I’ve got a mini story planned out and have written a skeleton for already πŸ™‚

I’ll post the first three lines of my teaser trailer that I’m going to make….

An ancient cursed sword….
One unfortunate soul….
An old evil awakened….